(you can find the english version of this article below)
In der E-Mail sowie im KIS werden Ihnen der Zertifikats-Block sowie das notwendige Zwischenzertifikat angezeigt, die wie folgt aussiehen:
 -----BEGIN CERTIFICATE-----
 MIIDvjCCAyegAwIBAgIOB5YAAAACHynGCE6FA6owDQYJKoZIhvcNAQEFBQAwgbwx
 CzAJBgNVBAYTAkRFMRAwDgYDVQQIEwdIYW1idXJnMRAwDgYDVQQHEwdIYW1idXJn
 ...
 yYz1+j6637pt8s9NYsw3k0lZrK2Z38kzUOBj4MqLayQ8/rqlQgniuYa5USpzEwX+
 v1vtw+8PW6QWjb8cAjsSavpqL0h7lq53RxbDm0nybYh9Qei1ibU4MiYUXn42AE8a
 qyw=
 -----END CERTIFICATE-----
Speichern Sie diese beiden Zertifikate in einer Textdatei auf Ihrem Server. Nennen Sie diese z.B. "c:\zertifikat.cer". Öffnen Sie die Konfigurationsoberfläche, den "Internetinformationsdienste-Manager".
Aktivierung ab IIS 7 bei durch HostEurope ausgestellter Zertifikatsanforderung:
Im KIS ist ein Download im PKCS12-Format möglich. Dieser Download nutzt Ihre Kundennummer als Passwort, da PKCS12 eine Verschlüsselung voraussetzt.
Dieses muss über den IIS Manager importiert werden.
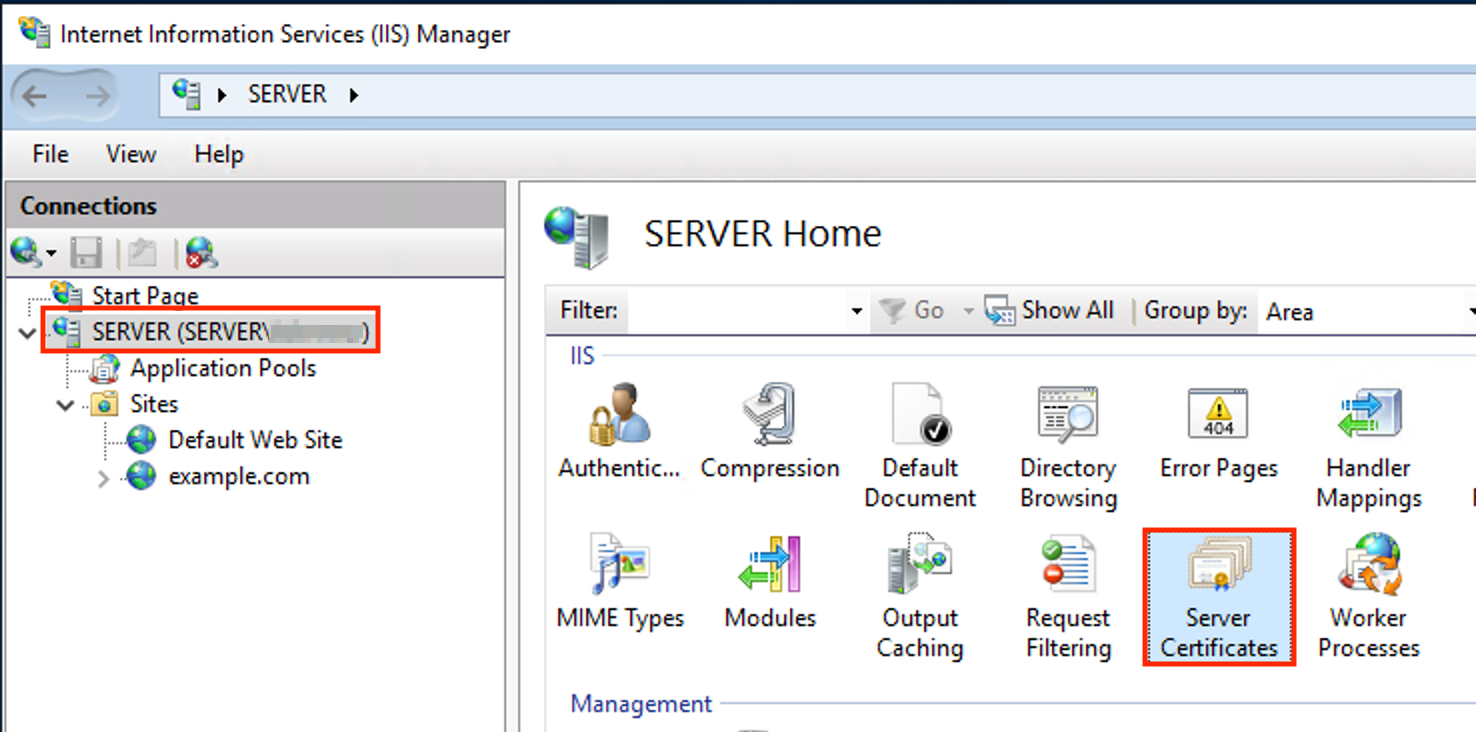
- Starten Sie den IIS Manager über Start -> Verwaltung -> Internetinformationsdienste (IIS)-Manager.
- Wählen Sie Ihren Server aus und öffnen in der rechten Ansicht (Feature-Ansicht) unter "IIS" den Unterpunkt "Serverzertifikate".

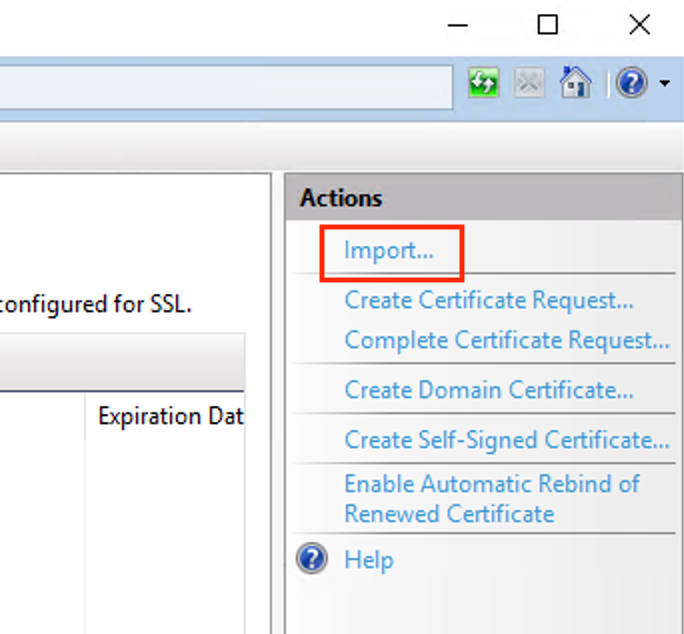
- Von dort aus unter "Aktionen" den Unterpunkt "Importieren":

Dort geben Sie einfach den Dateinamen mit Ihrem Zertifikat an.
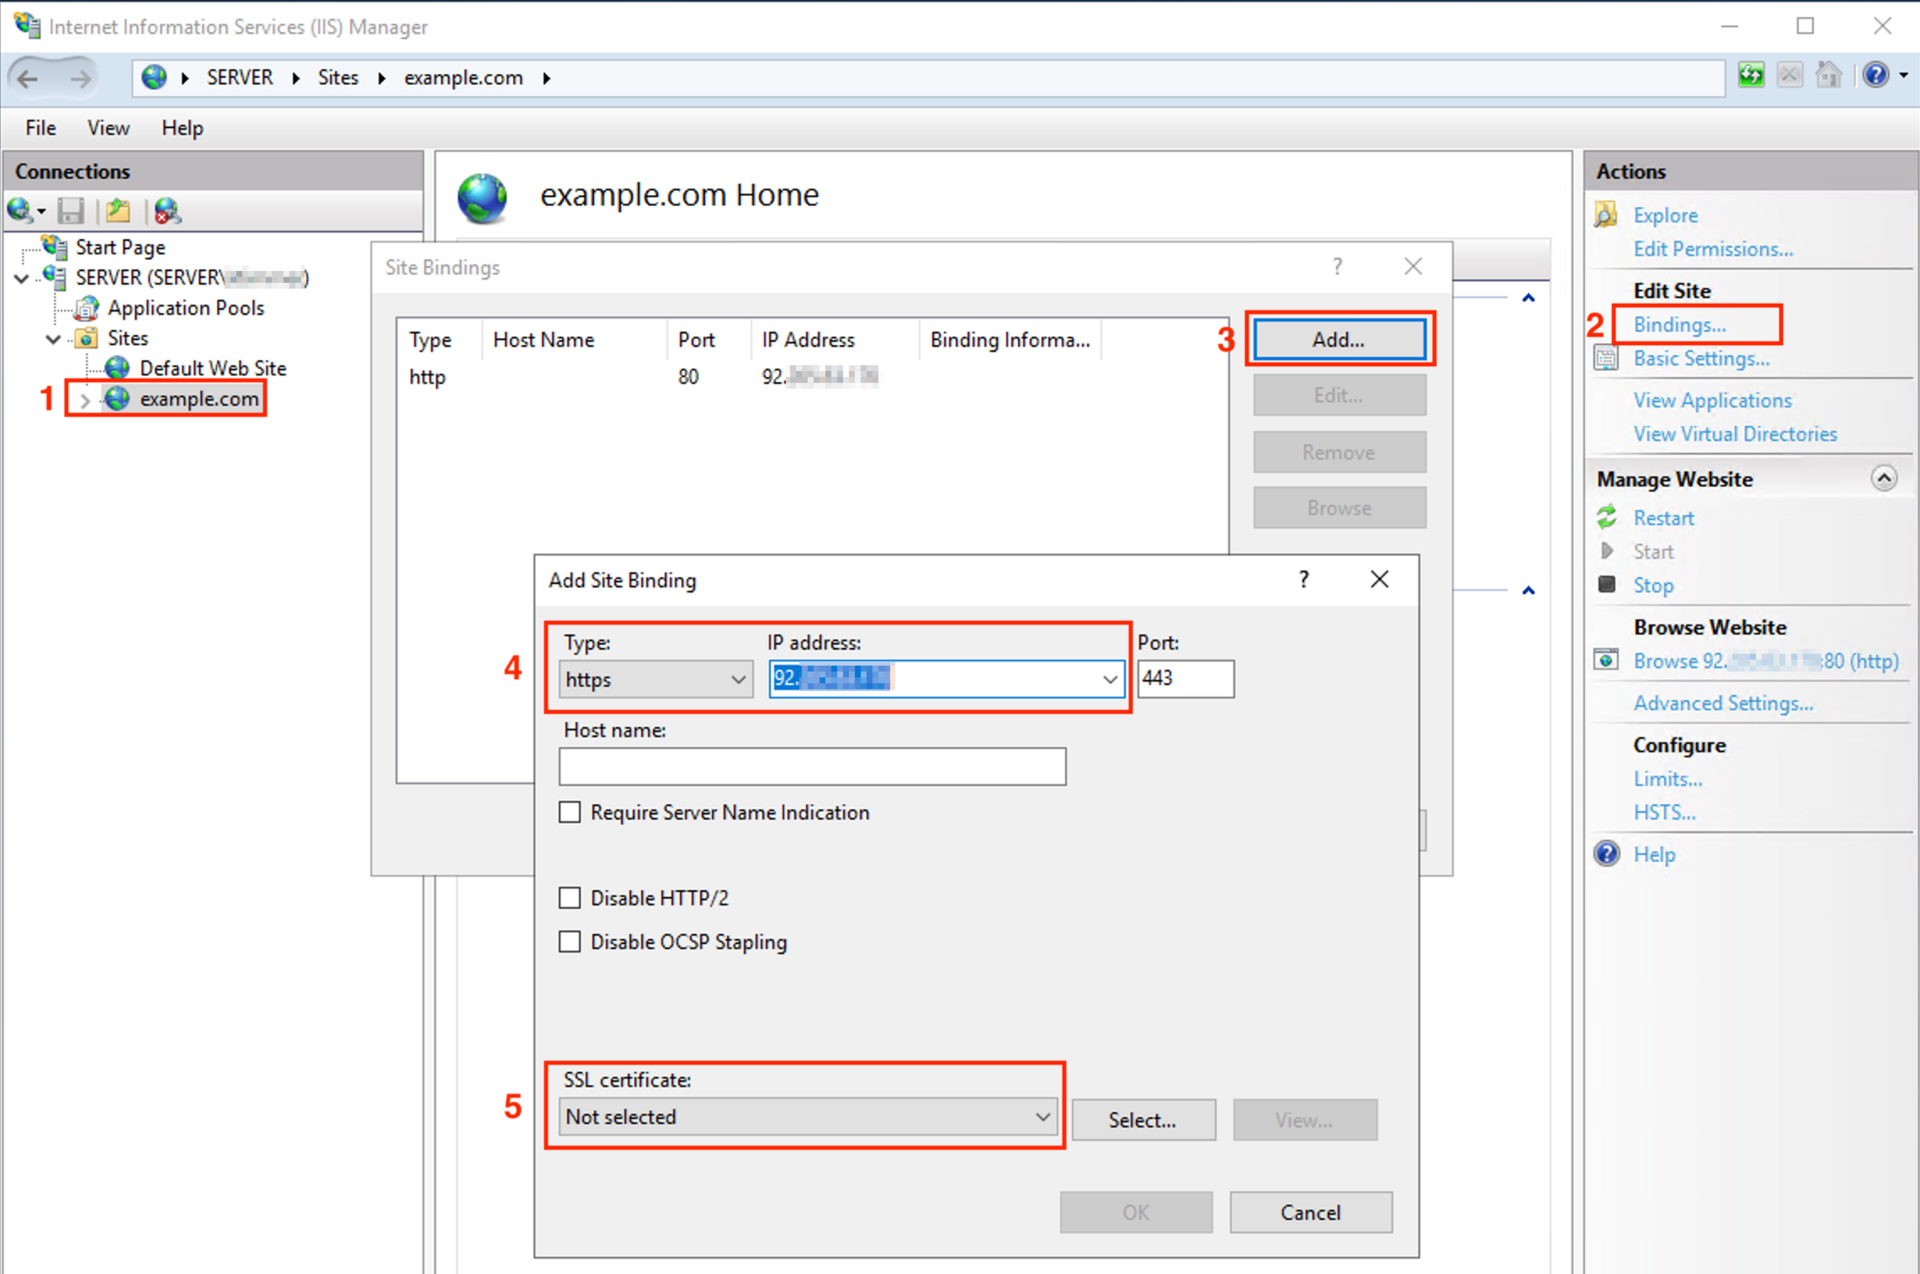
- Wählen Sie die Seite aus, die per SSL erreichbar sein soll.
- Wählen unter "Aktionen" den Unterpunkt "Bindungen" aus.
- Klicken Sie auf Hinzufügen.
- Wählen Sie als Typ https, Ihre IP Adresse, als Port 443
- Unter SSL-Zertifikat das vorher installierte Zertifikat.

Ihre Adresse ist dann via HTTPS erreichbar.
Aktivierung ab IIS 7 bei selbst ausgestellter Zertifikatsanforderung:
- Navigieren Sie zu Start -> Verwaltung -> Internetinformationsdienste (IIS)-Manager und öffnen diesen.
- Wählen Sie Ihren Server aus und öffnen in der rechten Ansicht (Feature-Ansicht) unter "IIS" den Unterpunkt "Serverzertifikate".
- Von dort aus unter "Aktionen" den Unterpunkt "Zertifikatanforderung abschließen". Dort geben Sie einfach den Dateinamen mit Ihrem Zertifikat an. Da das Kennwort im Hntergund generiert wurde ist eine Angabe nicht notwendig.
- Nun wählen Sie die Seite, die per SSL erreichbar sein soll, aus und wählen unter "Aktionen" den Unterpunkt "Bindungen" aus.
Klicken Sie auf Hinzufügen. Wählen Sie als Typ https, Ihre IP Adresse, als Port 443 und unter SSL-Zertifikat das vorher installierte Zertifikat.
Ihre Adresse ist dann via HTTPS erreichbar.
Sollte kein PKCS im KIS vorliegen:
Sollten Sie den CSR nicht im IIS erzeugt haben (sondern z.B. durch uns oder anderweitig), ist es nötig, Zertifikat und Key zunächst in das PKCS-Format zu konvertieren:
- Kopieren Sie beide Textblöcke (und je nach Zertifikatstyp notwendige CA-Zertifikate) in eine (Text-)Datei, z.b. key_und_crt.txt.
- Installieren Sie "openssl" (www.openssl.org). Unter Linux ist dies oft vorinstalliert.
Führen Sie das Kommando wie folgt aus:$ openssl pkcs12 -in key_und_crt -out key_und_crt.pfx -export
Enter Export Password:
Verifying - Enter Export Password: - Notieren Sie sich das gewählte Passwort; es darf nicht leer sein.
- Kopieren Sie die .pkcs12-Datei auf den Server und importieren Sie dies als neues Zertifikat für die Domain ("Zertifikat aus eine PFX-Datei importieren").
Ggf. müssen davor schon installierte Zertifikate gelöscht werden.
In the e-mail as well as in KIS, you will see the certificate block and the necessary intermediate certificate, which look like this:
 -----BEGIN CERTIFICATE-----
 MIIDvjCCAyegAwIBAgIOB5YAAAACHynGCE6FA6owDQYJKoZIhvcNAQEFBQAwgbwx
 CzAJBgNVBAYTAkRFMRAwDgYDVQQIEwdIYW1idXJnMRAwDgYDVQQHEwdIYW1idXJn
 ...
 yYz1+j6637pt8s9NYsw3k0lZrK2Z38kzUOBj4MqLayQ8/rqlQgniuYa5USpzEwX+
 v1vtw+8PW6QWjb8cAjsSavpqL0h7lq53RxbDm0nybYh9Qei1ibU4MiYUXn42AE8a
 qyw=
 -----END CERTIFICATE-----
Save these two certificates in a text file on your server. Name this e.g. "c:\zertifikat.cer". Open the configuration interface, the "Internet Information Services Manager".
Activation of IIS 7 with certificate request (CSR) issued by Host Europe:
A download in PKCS12 format is possible in KIS. This download uses your customer number as password, because PKCS12 requires encryption. This must be imported via the IIS Manager.
- Start IIS Manager via Start -> Administrative Tools -> Internet Information Services (IIS) Manager.
- Select your server and open the sub-item "Server certificates" under "IIS" in the right view (Feature view).

- From there, under "Actions", select the sub-item "Import":

There you simply enter the file name with your certificate.
- Select the page that should be accessible via SSL.
- Under "Actions", select the "Bindings" sub-item.
- Click on "Add..."
- Choose as type https, your IP address, as port 443
- Under SSL certificate, choose the previously installed certificate.

Your address will then be accessible via HTTPS.
Activation of IIS 7 with self-created certificate request (CSR):
- Navigate to Start -> Administrative Tools -> Internet Information Services (IIS) Manager and open it.
- Select your server and open the subitem "Server certificates" under "IIS" in the right view (Feature view).
- From there, under "Actions", select the sub-item "Complete certificate request". There you simply enter the file name with your certificate. Since the password was generated in the background, it is not necessary to enter it.
- Now select the page that should be accessible via SSL and select the Bindings subitem under Actions. Click on Add.
Select as type https, your IP address, as port 443 and under SSL certificate the previously installed certificate.
Your address will then be accessible via HTTPS.
If there is no PKCS visible in KIS:
If you have not generated the CSR in IIS (but e.g. by us or otherwise), it is necessary to convert the certificate and key into PKCS format first:
- Copy both text blocks (and depending on the certificate type necessary CA certificates) into a (text) file, e.g. key_and_crt.txt.
- Install "openssl" (www.openssl.org). This is often pre-installed on Linux.
Execute the command as follows:$ openssl pkcs12 -in key_und_crt -out key_und_crt.pfx -export
Enter Export Password:
Verifying - Enter Export Password: - Write down the chosen password; it must not be empty.
- Copy the .pkcs12 file to the server and import this as a new certificate for the domain ("Import certificate from a PFX file").
You may need to delete any previously installed certificates.